From Panel to Play: Nova


Richard Rider was a normal Earthling teenager, although one that struggled with self-esteem issues and was filled with self doubt. One day, the wounded alien Rhomann Dey chose Richard as the recipient of his powerful responsibility of Nova Prime, the superpowered cosmic energy and space suit that would enable Richard to fight the space pirate who mortally wounded him. With those powers, Richard enthusiastically became Nova, The Human Rocket, and fought crime and tyranny on Earth and in space.

As he matured and grew in his own strength, Nova began taking on as much responsibility as his awesome powers demanded. Initially focusing on superheroics on Earth, he eventually transitioned to serving as a sort of interstellar police officer, working with other Nova Corps officers against the criminals of the galaxy. He returned to Earth with regularity, and found allies and romance, but space called him back to adventure. Eventually he would lead cosmic armies against destructive cosmic evil, fight powerful enemies one on one, and form new teams and alliances to protect life and free will across the cosmos. Among the stars, Richard Rider is considered one of the most valiant and fearsome protectors of good.

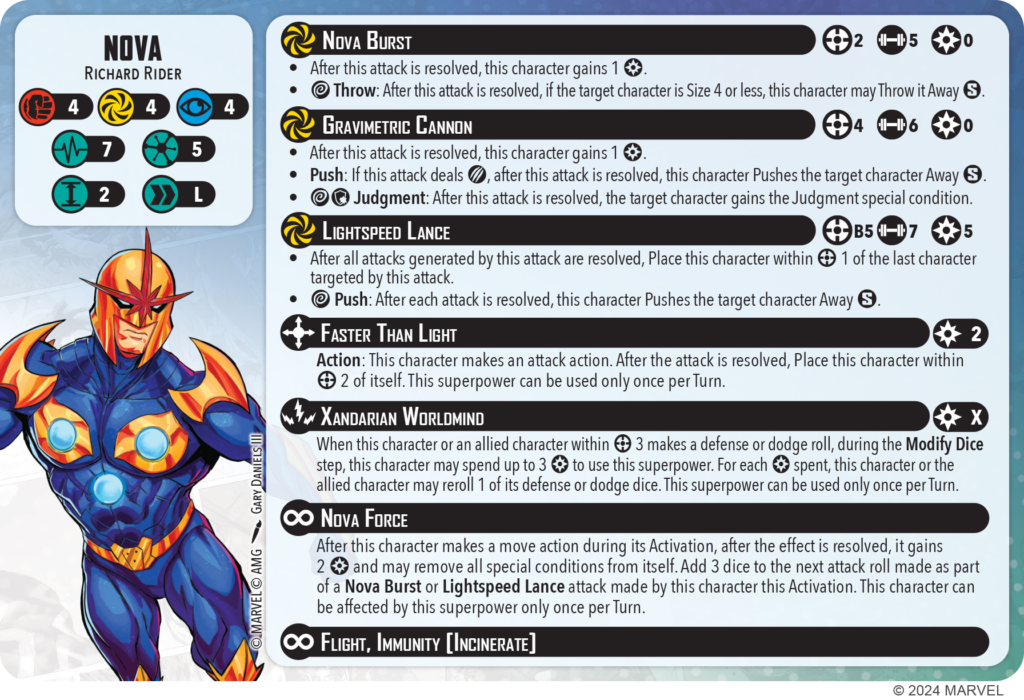
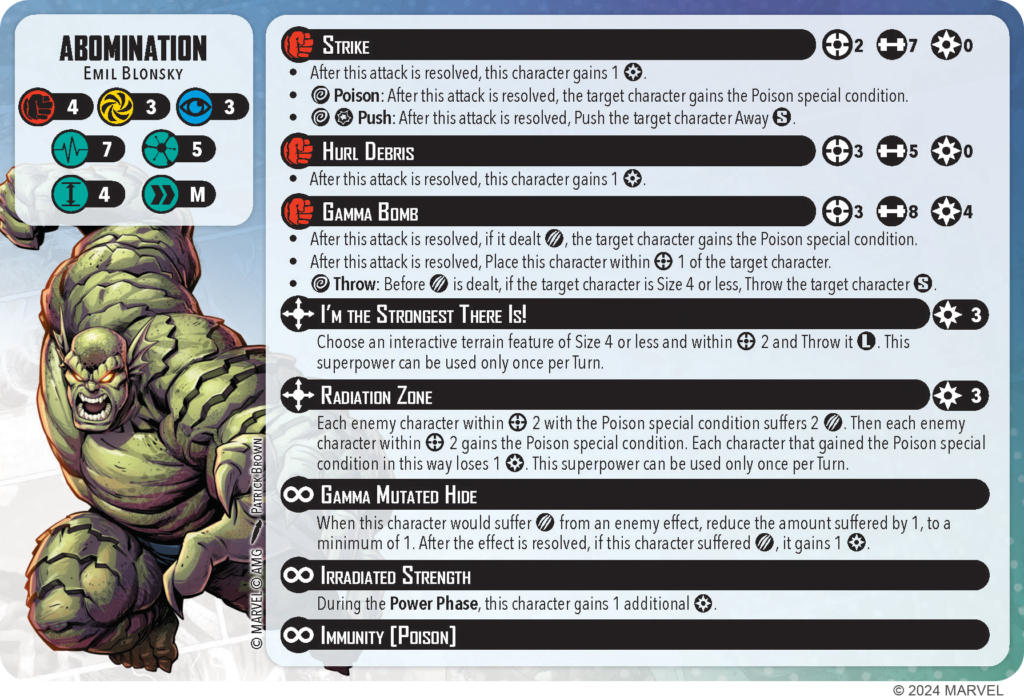
Nova’s offensive output is mostly expressed through his various expressions of the Nova Force, a near-limitless source of energy. For 0 energy, Nova can use either Nova Burst or Gravimetric Cannon. Nova Burst looks like a simple attack intended to gain 1 power for the attacker, until you notice it has a Wild trigger to Throw a target up to an impressive size 4. Being able to Throw almost any character is an extremely powerful ability and grants useful displacement options. Gravimetric Cannon has a longer range of 4 and one more power, with an additional chance of Pushing the target if it damages or applying the Judgment special condition. Players might notice that this specific Push doesn’t specify size, so he can move any character with it at range!

Nova often fights in space against hordes of enemies or ships, rocketing himself through them and trusting his protective aura, acting as a human rocket, and this is ideally represented on the tabletop by Lightspeed Lance. It’s a range-5 beam attack rolling 7 dice against each target. Additionally, it also Pushes each target on a Wild and Places Nova within range 1 of the last targeted enemy. Since the active player can choose what order to do the attacks in a beam, Nova can Place himself almost anywhere after the salvo of attacks is made. Savvy players will notice that all 3 of Nova’s attacks have either a Push or Throw, giving him fantastic displacement abilities that will make him sought after by many affiliations. In Web Warriors, Richard can supplement the already impressive focus on displacement and movement, whereas in many affiliations without it, he acts as a powerhouse addition bringing something new.

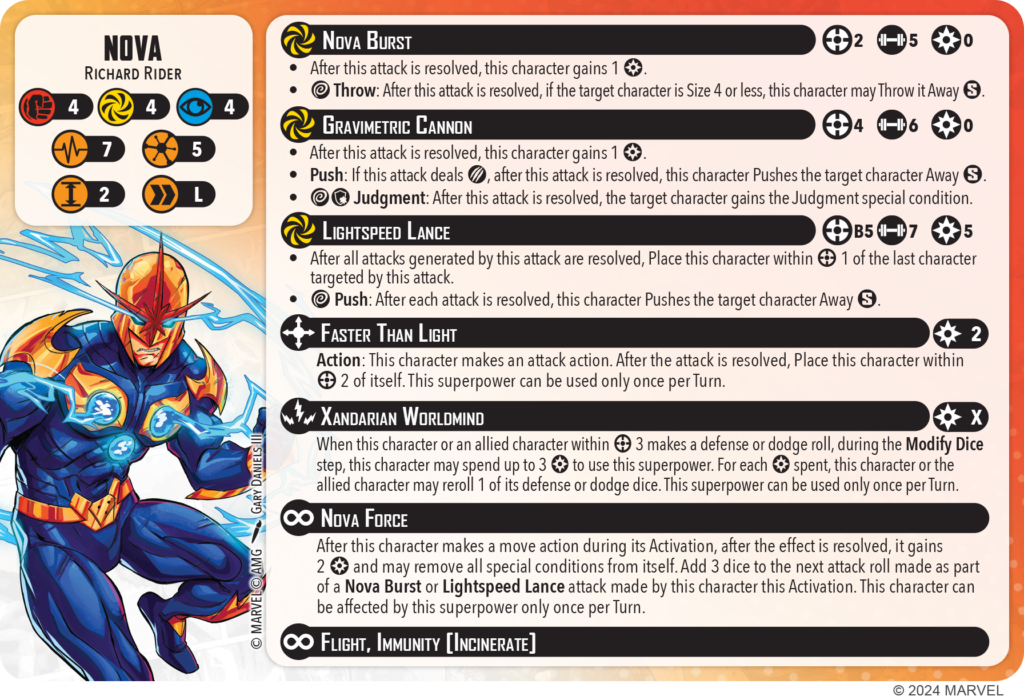
Players might notice that both Nova Burst and Gravimetric Cannon only gain a single power when used, without the potential for more. Well, thanks to the Nova Force superpower players don’t need to worry about gaining power. After a move action, Nova can remove all special conditions and gain 2 power. Then, the next Nova Burst or Lightspeed Lance attack gains 3 dice. The Nova Force pushes Nova to move and attack, and that’s represented fully in this powerful ability. If players really want to push the power gained, they might want to include him in a leadership that generates additional power, maybe like A-Force with She-Hulk’s leadership.

With Nova’s Faster Than Light superpower, Nova can make an attack and then place himself within range 2 of his location. This means that Nova can move for his Nova Force ability to trigger, attack for a boosted attack, and then Place himself range 2 in order to Interact or Contest with an objective token. If all that offense wasn’t enough, Nova also has access to the Xandarian Worldmind. This ability gives Nova and his allies within range 3 the ability to reroll defense and dodge dice for one power each. The Worldmind has incredible cognition, but at a high cost to the individual, and Nova has to decide if he needs that power to be on the offense or defense.

Nova has operated in a wide range of positions other than superhero teams on Earth, and he comes with two Team Tactic Cards representing that. Call for Backup represents his time in the Nova Corps when he could always rely on other Nova officers. By paying 3 Power, Nova can either choose a Secure objective within range 2 and Push each enemy character Contesting it Short, or he can give Slow to each enemy character holding an extract. In a pinch, Nova could even use this to line up enemy characters to get more enemies under a Lightspeed Lance attack. With Veterans of the Annihilation War, players can relive a moment from the Annihilation comic series. In it, Richard Rider and Gamora began a romantic relationship while working closely to keep back the deadly Annihilation Wave. When both characters use this card, they each gain a superpower similar to each other, showing their shared experiences. Gamora gains a version of the Worldmind giving her 2 defensive rerolls, while Nova gains Star-Crossed Strike from Gamora, enabling him to change a result to a hit if he rolls any Wilds. Giving Nova Star-Crossed Strike is especially powerful for a Lightspeed Lance attack.

With a bevy of offensive attacks, movement abilities, and defensive powers, there’s no wonder Nova was frequently called the Human Rocket, and now players of Marvel: Crisis Protocol can bring that Human Rocket to their battles.

That’s it for today’s installment of From Panel to Play! Thanks for joining us for this close-up of Nova and all he has to offer on the tabletop. Be sure to check back for more on new and upcoming releases of your favorite characters in Marvel: Crisis Protocol, and pre-order your copy of Yondu and Nova at your local gamestore or through the webstore today.

Until next time, Atomic Mass Games, signing off!

Abomination & Wrecking Crew

CP162 Abomination & Wrecking Crew

“Your pitiful display is nothing to my new-found power!”

Emil Blonsky was attempting to steal secrets from a military base when he was hit by a massive dose of gamma radiation that was supposed to destroy the Hulk. An unknown mutation saved him from certain death but turned him into the Abomination, a grotesque and massive creature of immense strength and durability able to rival the Hulk himself. They have fought many times over the years leaving a trail of destruction across the planet.

Dirk Garthwaite was the Wrecker before his defeat at the hands of Thor and his power sealed into a crowbar. In prison, he met Dr. Eliot Franklin, Henry Camp, and Brian Calusky who worked with him to escape and recover the enchanted crowbar. The four men together held the crowbar during a thunderstorm until a bolt of lightning struck and unsealed the power within it. That power was distributed to them, restoring the Wrecker and creating Thunderball, Bulldozer, and Piledriver. The four men are now known as the Wrecking Crew–a team of Super Villains capable of great destruction and mayhem.

Buy Now

Stat & Team Tactic Cards

Stat Cards

Team Tactic Cards

What’s Included

  • 5 Miniatures
  • 2 65mm Bases
  • 2 Character Stat Cards
  • 4 Team Tactic Cards
  • 1 insert

360° View

Miniature Assembly

Find the assembly diagram for the Abomination and Wrecking Crew here!

Download PDF

From Panel to Play: The Wrecking Crew

Marvel: Crisis Protocol

10/08/2024

There’s a storm on the way!

Read more

From Panel to Play: Abomination

Marvel: Crisis Protocol

10/03/2024

Abomination is ready to contend with the Hulk and prove that he is the strongest one there is!

Read more

Asmodee Store

Available at your friendly local game store or through the webstore

Buy Now

From Panel to Play: The Wrecking Crew


There’s a storm on the way! Dirk Garthwaite and his boys, Dr. Eliot Franklin, Henry Camp, and Brian Calusky, have escaped from Ryker’s Island and recovered the enchanted crowbar that contains the trapped power of Wrecker, a power that Dirk previously held. All four men hold fast to the crowbar and raise it into the sky! Lightning strikes! The mystic crowbar, Enchanted by Karnilla, Queen of Norns, disperses its power into the four men holding it, transforming them into the Wrecking Crew!

Every member of the Wrecking Crew has been enhanced with superhuman strength and durability. Their powers give them the capability to demolish anything in their way, and they enjoy doing just that. As career criminals, the Wrecking Crew have no qualms selling their services to the highest bidder, and there is no shortage of customers willing to pay top dollar to get access to super-powered muscle. Because of this, the Wrecking Crew end up doing odd jobs that other super-powered individuals might consider beneath them, but the Wrecking Crew doesn’t let that stop them from cashing in on their unique talents. The Wrecking Crew won’t let the law or Loki, who wants to reclaim the Asgardian power in their crowbar, stop them from getting what they want.

Dirk Garthwaite is the Wrecker. He leads the Wrecking Crew and wields the enchanted wrecking bar. Ulik taught him to throw his weapon so that it returns to him after smashing through its targets with mystically empowered strength. Dr. Eliot Franklin is Thunderball. He is a brilliant physicist with a deep understanding of gamma radiation and a chip on his shoulder that the Wrecker is the head of the Wrecking Crew. He wields a wrecking ball that can be empowered by the Wrecker’s crowbar to become almost indestructible, and he can use it to smash the ground and cause minor quakes that can knock enemies off their feet. Brian Calusky is Piledriver. His grip has been enhanced beyond even the other members of the Wrecking Crew, making him a ferocious grappler that can easily manhandle his opponents. Henry Camp is Bulldozer. He wears a special metal helmet that reinforces his upper body so that he can ram through any obstacles in his path. The Bulldoze superpower represents this capability as well as the exceptional demolition capabilities of the Wrecking Crew. Bulldoze can help line up a great Wrecking Bar Fling that catches multiple characters and interactive terrain pieces; creating a massive storm of shrapnel to overwhelm their opponents.

The Wrecking Crew are formidable alone, but a coordinated assault by all four can bring even the strongest foe down. Let’s Take ’em Down Boys! allows the Wrecking Crew to make 3 attack actions on their activation. They can Bulldoze into position, hit with Indestructi-ball to give their target Stun, follow up with Piledriver to give Stagger and Push the target Away, then throw their magic crowbar and Throw the target. Finally, they can play the Stronger Together Team Tactic Card to once again Throw the target long. That combination can move an enemy character far enough that they might not even get back with an entire activation of moving. That full string is very unlikely to happen with all the required triggers, but it’s truly spectacular when it does, and it brings a massive amount of excitement to their activation when they go for it.

Mystic Menace is a much less spectacular effect, but don’t let that fool you into thinking it’s not very effective. With Piledriver, the Wrecking Crew are quite good at moving enemy characters away from secures. If they do that on a round where Mystic Menace is up, they often leave enemy characters with the bad choice of staying away from that objective or gaining Hex and losing their extra dice from crits.

CP162 contains both The Wrecking Crew and Abomination, and both characters are great options for adding muscle to the Criminal Syndicate Affiliation. With their easy access to additional moves and attacks, the Wrecking Crew makes an excellent addition to a Criminal Syndicate squad led by Shadowland Daredevil (CP79). Wrecking Bar Fling can be extremely powerful when it’s targeting multiple characters that qualify for the rerolls from the Shadow War leadership, and they are one of the few characters that can reliably get 5 or more rerolls from Shadow War on their turn.

The Wrecking Crew also joins the ranks of the Asgardian villains in the Cabal Affiliation, and they make a fantastic addition to a squad led by Malekith, the Accursed (CP93). With Bulldoze and the additional move and power from Malekith’s leadership, The Dark Council, the Wrecking Crew have no problem getting across the table before attacking, which makes it more likely that they can Daze or KO their targets and trigger The Dark Council on their Turn.

More generally, any roster might want to include the Wrecking Crew to get access to their flexible attack suite. Indestructi-ball is one of the easiest ways to give out Stun, so it can be used to stifle any character that regularly tries to gain large chunks of power. Piledriver is a stupendously powerful attack for 0 power with 6 dice, Push on damage, and the possibility to Stagger if the target is stunned. Both effects of the attack give the Wrecking Crew great options to control enemy characters. Wrecking Bar Fling is insanely powerful when there are lots of Size 1 and 2 terrain features around the objectives, so having the Wrecking Crew in your roster for those situations can give you a situational massive advantage.

That’s all we have for today! Check back later for another From Panel to Play, the series where we give you your first look at how your favorite characters transition to the tabletop in Marvel: Crisis Protocol. Pre-order these characters and more at your local game store or through the webstore today.

Until next time, Atomic Mass Games, signing off!

Hobby Preview: Monsters and Tomb of Dracula

In today’s transmission, Atomic Mass Games Creative Director Dallas Kemp shares an in-depth look at the Tomb of Dracula and hobby tips.

When monsters rise…you need some sweet terrain to show them off! The Tomb of Dracula Terrain set is designed to be a centerpiece to your collection. We wanted to create the classic tomb and have a piece of terrain that can showcase the monsters and Dracula. The first step to the design was to create an overall shape and silhouette that captures the gothic vibe of Drac’s tomb and be able to tell a story around the four minis in the Monsters Unleashed set. We knew we wanted a castle with multiple levels and a full terrain experience. We went through a few designs but landed on the circular shape with the spiral stairs to allow our monsters to be fully viewed in the scene. Each level has a smaller platform to accommodate the base of the minis (even Moon Knight if you are feeling cheeky).

The next element that we fell on is the stained-glass window in the stairwell. We had a few designs that we went through, but landed on the idea of Dracula to of course have a giant stained-glass image of himself constructed in his domicile.

The center of Dracula’s deepest dungeon has his sarcophagus and great treasures. During the sculpting phase, we decided to add an ancient tome as an option as well. Perhaps Dracula finally retrieved the Darkhold for the Montesi Formula within!

More set dressing was added, including the tapestries, piles of treasure, and the steel-barred dungeon.

When it came time to paint the set, we had our intrepid painter Brendan Roy work on this one. He was able to create a beautiful atmosphere with the stonework by adding subtle colors and focusing on the lighter areas where the light would pass through the stained glass. Speaking of the stained glass, Brendan was able to really capture the grandeur of Drac’s image with clever use of very translucent paints over a light base coat.

Once painted, the tomb becomes a fantastic centerpiece to a thematic game of MCP set in the dark forests of Transylvania or maybe a crumbling castle set in the Dark Dimension! With a little hobby prowess, the parts can be easily converted to create several small pieces as well if that is more in line with your needs.

Additionally, you can use your tomb to display your monsters in their fully painted glory! Your granny will love it when she visits.

That’s all for today’s deep dive into Monsters and Tomb of Dracula. Be sure to check back for more previews on new and upcoming releases for Marvel: Crisis Protocol. The Monsters Unleashed Character Pack, Tomb of Dracula Terrain Pack, and more are available for pre-order or purchase at your local game store or through the webstore. Thanks for joining!

Until next time, Atomic Mass Games, signing off!

From Panel to Play: Abomination


Abomination is ready to contend with the Hulk and prove that he is the strongest one there is!

Emil Blonsky was a spy at the U.S. Air Force Base where Dr. Bruce Banner was conducting his experiments with gamma radiation when he was accidently bombarded with that radiation, turning him into Abomination. Unlike Hulk, Abomination can’t just shift between his human and superhuman forms. Without that capability, Abomination’s terrifying strength and appearance are always on display, and he is treated like a dangerous monster. That difference with Hulk, more than anything, drives Abomination’s hate towards him. While Emil still possesses his mind as Abomination, his lack of scruples and options push him to act like a monster as well.

As one of the few individuals capable of counterbalancing the strength of the Hulk, any mastermind would do well to recruit Abomination. Abomination leaps for the opportunity to prove his strength against any challenger—especially if that challenger is Hulk, so he’s ended up working as muscle for many other villains. Abomination doesn’t have to rely on his strength and endurance alone to win a fight, though. He can also emit incredibly toxic gamma radiation to disable and destroy his enemies.

Abomination’s Threat Value of 5 shows he’s not supposed to be the equal of the Hulk, but his durability and strength get close. His 7-die Strike with a size-unrestricted Push is exceptional among 5-threat characters. With solid defensive stats, 7 stamina on healthy and injured sides of his card, and damage reduction of 1 from Gamma Mutated Hide, he’s also got exceptional durability among 5 threats. If he can get into position to use it, he can trade blows with any character in the game.

Where Abomination struggles a little is needing to spend actions to move around if he doesn’t have the power to use Gamma Bomb, and it’s hard for him to proactively generate enough power to do everything he wants with his Strike only generating 1 power per attack. Luckily, he can use his medium move and 65mm base to quickly move to where enemy characters want to be so that he doesn’t have a lack of targets for his massive attacks. He also generates extra power when he is damaged due to Gamma Mutated Hide. If he can force the enemy to engage with him by pushing in aggressively enough, he won’t have a power problem. If he’s just 1 power away from using Gamma Bomb at an enemy at Range 3, he can use Hurl Debris to get it. When it does come time to Gamma Bomb, the 8-die attack and wild Throw trigger hit very hard.

With his power, Abomination can use I’m the Strongest There Is! to threaten enemy characters with almost every terrain feature on most tables. Radiation Zone is an ability that can be absolutely wild. With the Abomination’s 65mm base and Range 2, the area of effect is quite large. The first application of Poison with it is impressive, with the reduction of 1 power in addition to the condition. The second application, on another turn, is lethal. Two damage that isn’t reduced by defenses must be respected, or the opponent’s squad could all end up Dazed and KO’d.

Gamma Burst represents Abomination’s radiation at its most extreme. In combination with Radiation Zone to get Poison onto enemy characters, Abomination can reliably clear off an objective. More than that, a medium Push is quite a lot of movement, and Gamma Burst could put multiple enemy characters in much worse positions. A well-timed Gamma Burst has the potential to put a player playing Abomination in a very advantaged position.

Abomination often serves as the brawn to pair with the brains of another villain, and there’s no larger brain than M.O.D.O.K.’s! You Will Do As I Say, Monster literally throws the enormous Abomination at any problem that needs to be handled. Abomination suffering 1 damage from the collision is a small price to pay to get to grips with his enemies. Abomination and M.O.D.O.K. Scientist Supreme (CP145) share the Criminal Syndicate and Hydra Affiliations, giving those affiliations a potent combination to base a squad around.

CP162 contains both Abomination and the Wrecking Crew, and both characters are great options for adding muscle to the Criminal Syndicate Affiliation. In Hydra, Abomination has a strong synergy with Baron Strucker (CP76) and his leadership, Hydra High Council. Abomination healing when he causes an enemy character to gain Poison boosts up his survivability even more. Also, Baron Strucker can cause a cluster of enemy characters to gain Poison using his Deathsport Virus superpower without hurting Abomination due to his immunity. Then Abomination can follow up with Radiation Zone to damage all the enemy characters that gained Poison. Further, Abomination is a very durable character, and durable characters are affected more by special conditions since they stick around for longer before Dazing or KOing. Moving any special conditions Abomination gains to enemy characters using Hydra High Council then removes that vulnerability.

Abomination is a great addition to any squad that needs a durable character to reliably activate. With high defenses and Gamma Mutated Hide, Abomination isn’t usually an appealing target for an opponent to go after. That means he can often wait to activate since there isn’t much risk of him losing his activation during a round due to being Dazed or KO’d, freeing up other characters to activate first so that they don’t lose their activation that round. Having a stable character like Abomination means the whole team is more likely to take all their actions each round.

That’s all we have for today! Check back later for another From Panel to Play, the series where we give you your first look at how your favorite characters transition to the tabletop in Marvel: Crisis Protocol. Pre-order these characters and more at your local game store or through the webstore today!

Until next time, Atomic Mass Games, signing off!

Staff Hobby Feature—Dallas Paints Apocalypse Terrain


Join Creative Director Dallas Kemp as he delves into the Apocalypse Terrain with some hobby tips and tricks!

Apocalypse is upon us! With the new terrain coming for Apocalypse I wanted to get a quick and easy version of the terrain painted up to use on the tabletop using easy techniques and quick steps to maximize my time painting.

I assembled the terrain sets and primed them black as normal, but I did leave off the sarcophagus, the arches, and the eye to allow me to reach all the elements on the Rejuvenation Chamber set. Additionally, I made sure the mutant subjects were left out of the clear parts of the experiment chambers to allow painting of all the parts there as well.

To start the painting process, I airbrushed Monument Burnt Orange and Golden Brown in a 50/50 mix over all the areas I wanted to be stone.

This gives me a nice base coat to work from to create a warm stone color on the structures that will contrast nicely with the black areas I plan to utilize later.

Next step was to give all the stonework a drybrush of Monument Dark Warm Flesh. This will pop the edges of all the rock details and give some much-needed definition to the stones.

I used light circular motion to achieve a softer transition in my drybrush and avoid brush strokes.

I then used Purple and Magenta washes to create some depth and visual interest across the stones. I made sure that the wash lay in each crevasse but also had some thin areas on the flat surfaces to indicate variations in the lighting on the stone. After this step, reapply a light drybrush of the Dark Warm Flesh to emphasize the highlights.

Now for the areas I want to be black. In contrast to the steels, creams, and blues Aaron Lovejoy employed on the studio version, I wanted a simple onyx feel to my set. I laid a foundation layer of Monument Coal Black down on all the elements I wanted black followed by a light drybrush of Dark Warm Grey.

Finalize the black areas with a drybrush of Neutral Grey followed by a light edge drybrush of White Blue. The White Blue final touches should be minimal and just clip the edges of the details to give definition to each element.

For my final touches, the part that brings it all together, I glazed some Magenta into the vents and other areas of interest on the different terrain pieces. This just adds a bit of glow and sets the scene a bit better. I glued all the parts back together and cleaned up any mistakes I made.

I used a glaze of Transparent Yellow followed by Transparent Red on the flames for a quick but effective flame effect.

The mutant subjects were painted, then the insides of the clear tubes were glazed with a variety of colors to give a sense of malicious intent to the parts. Then all were glued together and final touches applied to the parts.

And that was the basics of getting the Apocalypse terrain painted in just a few hours. Hopefully that will help you get your Apocalyptic terrain set up in no time for an Apocalyptic good game of MCP!

Thanks for joining us on today’s deep dive into Apocalypse Terrain. Be sure to check back later for additional features of terrain and to see how your favorite characters transition to the tabletop in Marvel: Crisis Protocol.

Until next time, Atomic Mass Games, signing off!

From Panel to Play: Weapon X & Maverick


Before he was known far and wide as the Super Hero Wolverine, he was the specimen known as Weapon X in the Weapon X Program. Aimed at creating super soldiers, the scientists first worked at making a team of highly effective soldiers with no other loyalties using a combination of mind control and implanted memories. When that proved successful, they took Logan and fused his skeleton with unbreakable adamantium in a process designed to make him an even more effective living weapon. With his healing and unbreakable skeleton, they envisioned a programmable killing machine able to complete any high-risk operation. What they didn’t envision was losing control of him in the process and creating a savage, enraged warrior that didn’t remember anything that might temper his anger. Weapon X broke out, allowing him to live life as a free man and eventually find his way to Xavier’s School for Gifted Youngsters.

Wolverine, Weapon X focuses on doing what he’s best at, which isn’t very nice! Berserker Rage grants an extra die when attacking a target for a second time, and pierce gives him the chance to do more damage than a strength 5 attack would suggest. When he has 4 Power he can unleash his Uncontrollable Weapon attack, rolling 7 dice but also potentially dealing damage to all other characters within range 2 AND potentially making a second free Uncontrollable Weapon attack on the same target. Thankfully for his teammates, you can use Charge to reposition first to hopefully avoid damaging too many friendly characters.

Weapon X’s new Adamantium Skeleton causes him to count as a size 3 for effects that want to Throw or Push him, and Healing Factor [3] is going to further make him difficult to injure if your opponent doesn’t fully hurt him. Unfortunately, Savagery Protocols stops him from having any effect on Extract tokens, but his dogged instincts are sharpened around Secure Tokens. While within range 1, Weapon X will gain 2 attack dice but remove 1 defense die as he focuses on the only thing he cares about in the moment: the removal of his enemies, or those he views as such!

As Weapon X becomes injured, he becomes even more of a threat to his opponents and liability to his allies. The first change being Berserker Rage becoming A2. With Charge, this becomes an incentive for your opponents to spread out or enjoy the attention of an angry Weapon X.

When injured, he loses Savagery Protocols for the simpler Berserker Wrath, keeping the inability to control Extract tokens while losing the ability around Secure objective tokens. He also gains Aimless Aggression, a unique ability that potentially allows him to damage all characters within range 2 when he is KO’d. Pushing Weapon X forward to engage multiple enemies makes the opponent think twice before attacking him or risk the aggression of a brutal counterattack.

Christoph Nord, or Maverick, is a member of the Weapon X program and a skilled mercenary. As such, he has access to weapons and experiences that make him a dangerous opponent to anyone looking to stop his objectives. His Plasma Blasters and Adamantium Knife give him strong choices for energy and physical attacking, his Agent Zero Attack allows him to roll 7 dice and Throw an enemy character of size 3 or less.

His Anti-Healing Factor Corrosive is a nasty surprise he took from the Weapon X Program, and in Marvel: Crisis Protocol it allows him to stop a nearby character from removing any damage from themselves! Additionally, he has the power of Kinetic Energy Absorption, giving him 1 Power and a short advance in any direction after he’s been damaged by a physical attack.

Representing their time in the Weapon X Program, Weapon X and Maverick come with 2 dynamic options for your Weapon X squads. Implanted Memories allows an allied Weapon X character to damage someone after an enemy effect damages them. Nicely, this doesn’t have to be an attack, so they can go after Magneto after one of his many throws!


Alongside it, Maverick’s Weapons Stash shows how this mercenary is always prepared for whatever job he takes. Maverick may spend 3 Power and place a Stash to allow allied characters to gain cover or remove the token from the board and gain 2 additional dice on their next attack. Whatever illicit guns he has in that crate are more than enough to even the playing field!

When you’re ready to level up your army of fighters with these two mercenaries, be sure to pre-order Weapon X & Maverick at your friendly local game store or through the webstore. Check back later for yet another installment of From Panel to Play, the series where we give you your first look at how your favorite characters transition to the tabletop in Marvel: Crisis Protocol.

Until next time, Atomic Mass Transmissions, signing off!

From Panel to Play: Apocalypse

Beware! Apocalypse awakens!

Armed with technology that allows him to regenerate between ages and fueled by his belief that only the strong survive, Apocalypse awakens from his rejuvenation chamber between ages to search the world for more power. During one awakening, he found it in the form of a Celestial ship. He used that technology to augment his innate mutant power of manipulating his body at an atomic level. He uses this Celestial technology to transform mutants from the ages he awakens into his loyal lieutenants, the Horsemen of Apocalypse. Apocalypse and his horsemen aim to cull the weak of the world, brutally imposing their philosophy of survival.

Apocalypse forms weapons out of his body to exploit the weaknesses of his enemies with his Biomorphic Arsenal attack, and the Cower Before Me trigger plays into Apocalypse’s special condition-focused gameplan. You Will be Remade Through Me gives him a unique way to take advantage of conditions his squad puts out by replacing duplicates with other conditions. En Sabah Nur’s Judgment adding 2 dice for each special condition is a powerful finisher for any enemy character with multiple conditions.

What doesn’t kill Apocalypse makes him stronger. Only the Strong Remain allows Apocalypse to heal back from weak attempts to harm him, and an attack that only deals 1 damage to him leaves him better off than if that attack had not been made, especially if that attack would cause him to gain a condition he’s immune to. His resilience becomes extreme on his injured side, where he becomes immune to all special conditions.

Apocalypse augments the power of his squad with technology. Celestial Technology is a long range place for his allies that can completely change the shape of a game. His leadership, Apocalypse’s Horsemen, is the most powerful representation of his ability to augment the power of his team, though.

Apocalypse has a whole new level of power when he uses his leadership to gain Master of the Horsemen. He gains access to a toolbox of active superpowers from the Horsemen cards assigned to that game. He and his Horsemen also gain access to rerolls and extra power to use those superpowers by spending Evolution tokens from the Master of the Horsemen card. His Horsemen are also greatly empowered by his leadership.

Each character in Servants of the Apocalypse is eligible to be assigned 1 of 2 different Horsemen Cards when the leadership is chosen. For example, Wolverine can be assigned the Death or War Horsemen Cards. If Wolverine is given War, he gains the Fury and Horseman of War superpowers. Apocalypse, as Master of the Horsemen, then also gains the ability to use the Fury superpower once per turn. War is built to brawl and generates Evolution tokens from both dealing and suffering damage. Famine, meanwhile, doesn’t want any part of the brawl War wants to cause. They are given a superpower to deny a fight to the enemy, and they generate Evolution tokens by doing just that.


Pestilence’s Consuming Blight is great in a brawl, but the special conditions they put out are also effective at controlling enemies without fighting them. Either way, Pestilence generates Evolution tokens by spreading conditions to as many characters as possible. While War is built to start fights, Death is built to end them. Even the most powerful Horseman of Death benefits from waiting for the moment when they are strongest and their enemy is weakest before striking.
Each of the Horsemen benefitting from different, and sometimes conflicting, situations means a Servants of the Apocalypse player has to try to create situations where each Horseman they take can thrive.

Building a Servants of the Apocalypse–focused roster and making squads with it has an additional level of complexity that rewards deep familiarity with the affiliation. In addition to considering everything else that goes into squad building, an Apocalypse player needs to consider which Horsemen Cards they want for that game and which characters should be assigned those cards. Getting the most out of Servants of the Apocalypse will take some practice and thought.

In addition to the gameplay, Servants of the Apocalypse is a great hobby opportunity. Horsemen are augmented versions of the characters in the affiliation. The change shown between Angel and Archangel shows just how drastic these augmentations can be, and the metal wings of Archangel are great inspiration to make similar changes to other characters. Similarly, the depictions of Wolverine and Gambit on the Death Horsemen card show some other visions for what Horsemen transformations could look like. A Servants of the Apocalypse roster can also stand out with a unique paint scheme inspired by the transformations of Apocalypse’s Horsemen.

In addition to everything Apocalypse offers the standard game mode, an Ultimate Encounter for Apocalypse can be found in Rejuvenation Chamber. In that Ultimate Encounter, the crisis teams try to sabotage Apocalypse’s Rejuvenation Chamber before he can awaken to his full power. Apocalypse’s Horsemen, meanwhile, try to defend the Celestial technology and force Apocalypse’s evolution to progress faster. When Apocalypse awakens, he uses 1 or 4 different cards based on how strong he was allowed to become. Unlike the standard game, the affiliation restriction is removed from who can be Horsemen in the encounter, giving more freedom to create the Horsemen a player imagines. That encounter can optionally use the terrain found in CP185, Dark Future Terrain Pack, and the treasure chests in CP110, Shrine to En Sabah Nur, in place of the tokens found in CP194, Rejuvenation Chamber to immerse themselves in a setting inspired by Apocalypse.

In addition to their uses in the CP194 Ultimate Encounter, the terrain in CP185 and CP110 comes with One-Shot cards that can be used to enhance standard games of Marvel: Crisis Protocol.

Prepare for the arrival of Apocalypse and pre-order these new packs, that will shake the world of Marvel: Crisis Protocol. Check back later for another From Panel to Play, the series where we give you your first look at how your favorite characters transition to the tabletop in Marvel: Crisis Protocol. Pre-order these characters and more at your local game store or through the webstore today.

Until next time, Atomic Mass Games, signing off!