TIE/sa Bomber Preview
09/11/2023SWZ98TIE/sa Bomber

The TIE/sa Bomber Expansion Pack adds four new Standard Loadout cards to the Empire’s squad building options. Each Bomber has a different focus, so it will be important to pilot them correctly to take advantage of their strengths. Let’s take a look at those new cards and some of the best ways to use them.
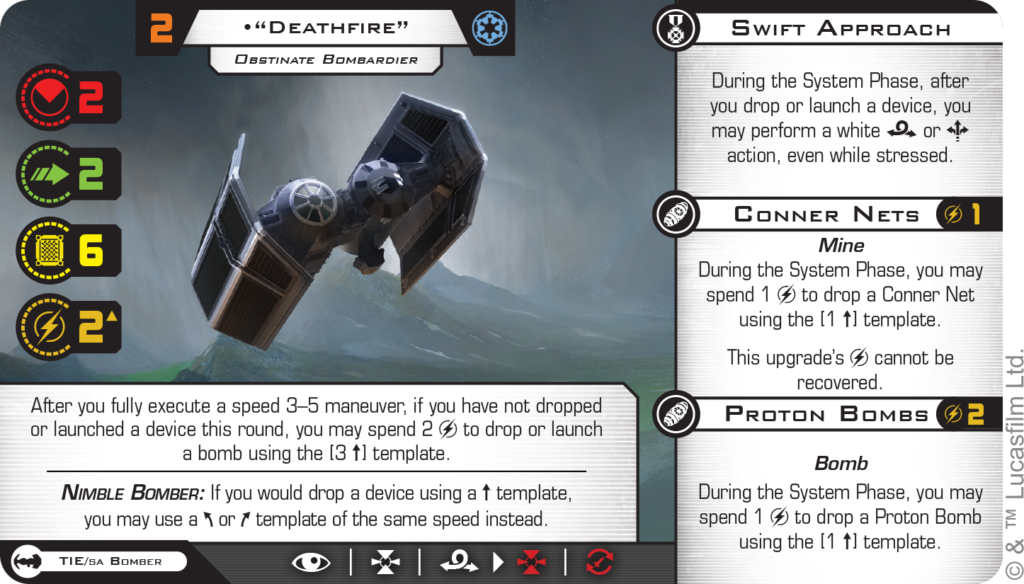
“Deathfire” is focused completely on his devices. He has no other special attacks, so his main source of damage is devices and a fairly weak primary weapon. However, he has a lot of tricks to use. His first choice is going to be to drop either device in the System Phase, and boost or roll after doing so, or limit himself to his Proton Bomb and use his pilot ability. If he uses his pilot ability, he can either launch the Proton Bomb with a 3 straight template or use a 3 straight or 3 bank to drop it. Savvy pilots will do best to keep in mind that using the 3-speed template keeps “Deathfire” safe from his own bomb. There are several tactics that use this ability. The most obvious play is to have “Deathfire” leading your other ships towards a group of opposing ships and launch a bomb as you get into a fight at range 1 or 2. Either the opposing ships flee from your force, or they take a critical damage each as the combat starts. Another option is having “Deathfire” protect a flank: a 3-turn with a 3-bank drop will leave a surprise on any flanking ships looking to approach your sides. He can also do his 5-speed Koiogran turn and use his ability. Dropping a device behind him, then will hit ships that weren’t even in combat range at the start of the round! Be careful getting too aggressive with his bomb drops, though. If you send “Deathfire” too far away from supporting elements, you’ll trade a good bomb drop for a destroyed TIE Bomber.
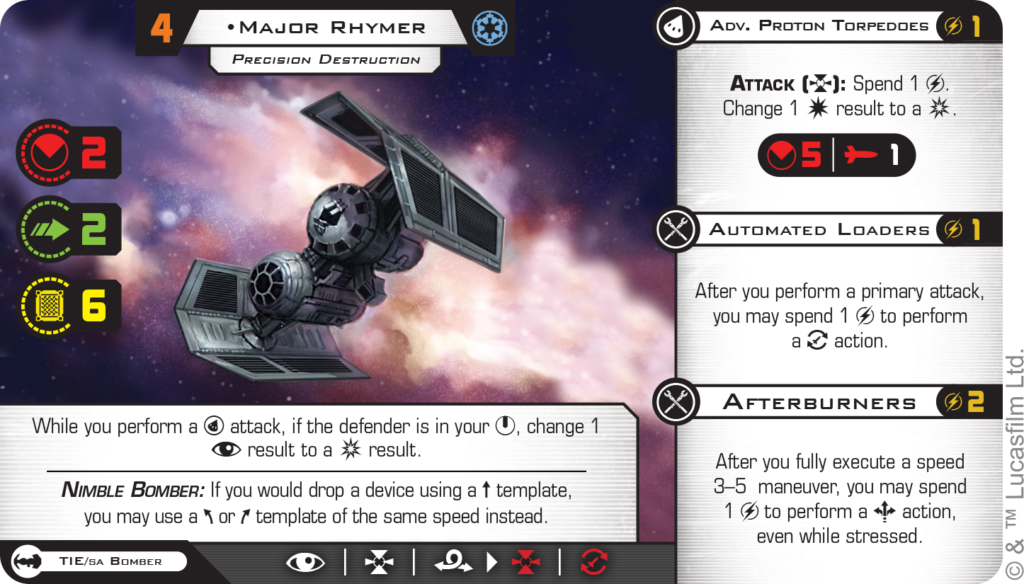
Major Rhymer’s focus is on his Advanced Proton Torpedo. His effectiveness in any given battle will be measured in how well you use that weapon. If you don’t get it to shoot at all, Major Rhymer is not earning back his points. If you get to fire it multiple times at key targets, you’ll move yourself closer and closer to winning the game. Major Rhymer has a few tools to help him line up these torpedo shots: Afterburners give the TIE Bomber a limited number of boost actions, which he’ll need to get into range. A 4-straight followed by a bank boost, barrel roll, and red target lock will cover a lot of distance and hopefully get you in a good position to launch the torpedo. After you fire the torpedo, all you need to do is fire your primary while not stressed to reload it, and the disarm token from reloading won’t matter as it’ll be removed that same turn! If you can line up a bullseye with Major Rhymer, he can even convert a focus result to a critical result, which will give you two conversions to criticals. Generally, you’ll want to spend your target lock first to reroll any blanks and focuses before using this ability, if you are looking to maximize your damage. Much like “Deathfire”, be careful chasing the torpedo shot and getting away from your support, as your TIE Bomber can easily be destroyed by an opposing list.
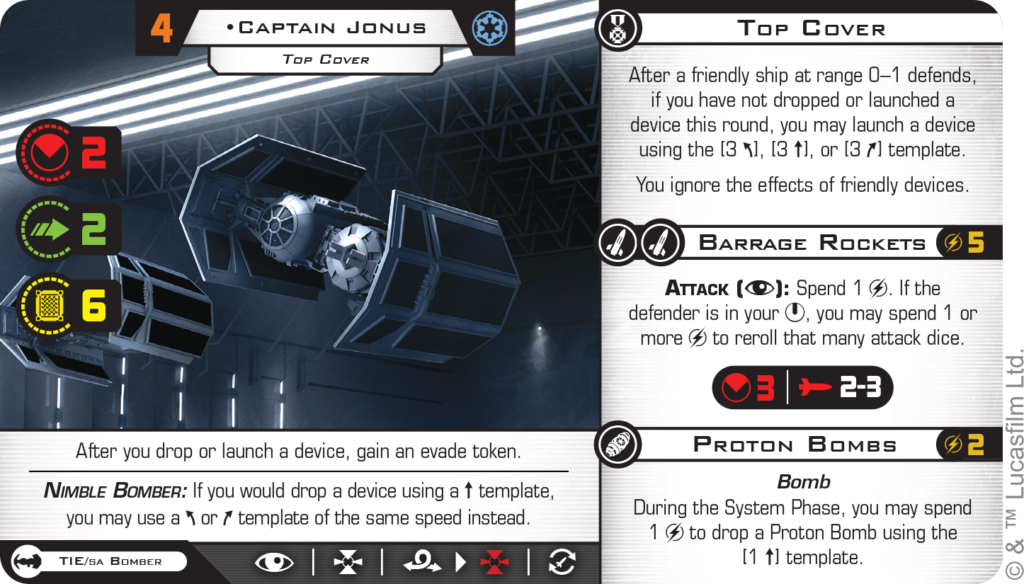
Captain Jonus isn’t as strongly focused on a single upgrade as the previous two Bombers. He tries to combine both of his special weapons into a devastating series of attacks. He’ll almost always focus, so that he can fire his Barrage Rockets when he attacks. However, if your opponent fires at him or a ship near him, he can launch a Proton Bomb in response! He even gains an evade token to help defend against future attacks afterwards. The Proton Bomb doesn’t explode that turn, since it will wait until an Activation Phase ends. Your opponent will have a chance to avoid the bomb, as will any of Jonus’s friends. Jonus himself ignores all friendly devices, including ones dropped by other TIE Bombers, so he can stay in the area and continue shooting Barrage Rockets at fleeing opponents. Unlike other TIE Bombers, Jonus has a white reload action, so he can reload his bombs and rockets without stress. Considering the rate he’ll be using them, he might need it!
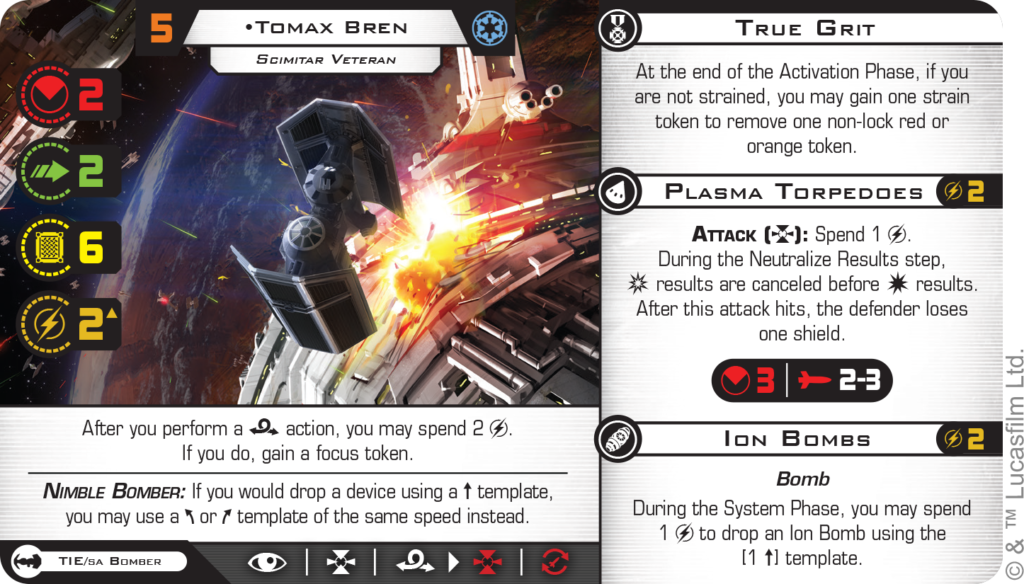
Finally, Tomax Bren is the highest initiative Bomber, and can make very accurate Plasma Torpedo attacks to remove shields from an opposing target. When Tomax performs a barrel roll, he can get a focus token and then do a red target lock action. This leads to a double-modified Plasma Torpedo before any other Bombers fire, which will likely hit and remove shields from a target. At the end of the Activation Phase, if you don’t think Tomax will draw much fire from your opponents, you can even trade the stress away for a strain token, to keep his movement and action options open for the following turn.
Finally, Ion Bombs round out Tomax’s loadout, to drop on opponents looking to outflank his team. When flying Tomax, you’ll want to make sure to maneuver places that will give you room to barrel roll and use his abilities as often as possible.
The Standard Loadout TIE Bombers all have different and unique play styles. Picking the right ones for your list and using them to maximize their strengths will lead the Empire to victory!
Order the TIE/sa Bomber Expansion Pack on the webstore or at your local game store today!